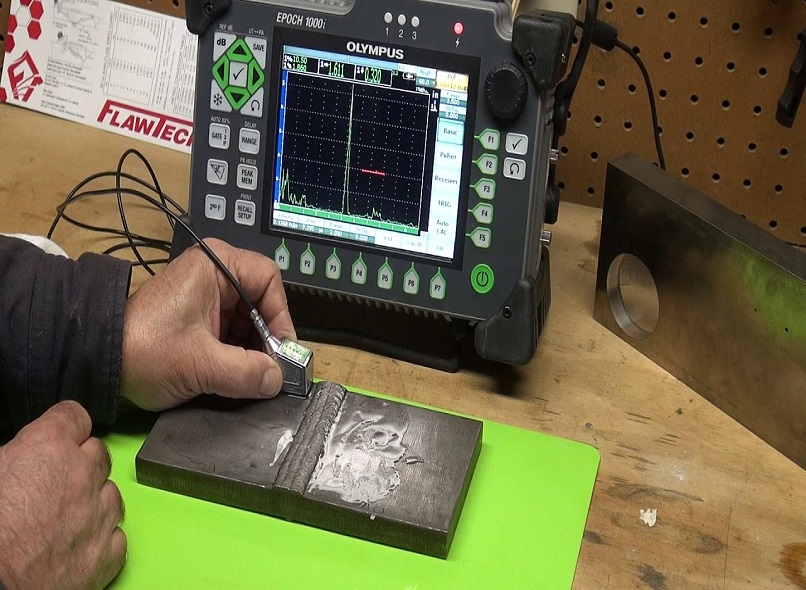
Unveiling the Intricacies of the Process of Ultrasonic Weld Testing Equipment

Ultrasonic weld testing equipment is a highly advanced and indispensable tool used in various industries to assess the quality and integrity of welded joints. This non-destructive testing method utilizes ultrasonic waves to detect and evaluate any defects or discontinuities in the weld, ensuring the reliability and performance of critical components and structures.
The process of ultrasonic weld testing equipment involves a series of intricate steps, each contributing to the accurate and comprehensive assessment of weld quality. Let's delve deeper into each step to gain a deeper understanding:
1. Preparation and Setup
Before initiating the testing process, meticulous preparation and setup are vital. This includes thorough cleaning of the surfaces to be tested to eliminate any contaminants that could interfere with the ultrasonic waves. Additionally, proper alignment and fixation of the weld joint are crucial to ensure precise and consistent testing results. The preparation stage also involves selecting the appropriate transducer and determining the testing parameters based on the specific requirements of the weld. This attention to detail in the preparation stage sets the foundation for accurate and reliable testing.
2. Calibration and Verification
Calibration is a critical step in the process, ensuring that the ultrasonic weld testing equipment is accurately calibrated to measure and interpret ultrasonic signals. Calibration involves adjusting the equipment settings and reference standards to ensure reliable and accurate measurement. Verification of the calibration is performed to validate the accuracy of the equipment by comparing the test results with known reference standards or test blocks. This step helps establish a baseline for accurate defect detection and measurement, providing confidence in the results obtained.
3. Coupling and Transducer Placement
Coupling is the process of applying a coupling agent, such as a liquid or gel, between the transducer and the weld joint. This coupling medium facilitates the efficient transmission of ultrasonic waves and ensures optimal contact between the transducer and the surface being tested. Proper coupling is vital for maximizing signal strength and minimizing signal loss during testing. Transducer placement is another crucial aspect of the process. The transducer, which emits and receives the ultrasonic waves, needs to be positioned correctly to cover the entire weld area. Multiple transducers may be used to ensure comprehensive coverage and accurate detection of defects. Precise transducer placement plays a significant role in capturing reliable and representative data.
4. Scanning and Data Acquisition
Once the equipment is prepared, calibrated, and coupled, the scanning process commences. The transducer is moved along the weld joint, emitting ultrasonic waves into the material. These waves propagate through the weld and interact with any defects or changes in the material's structure. The reflected waves are received by the transducer and converted into electrical signals. These signals, containing information about the weld's internal structure, are captured and recorded by the equipment for further analysis. The scanning process requires a systematic and thorough approach to ensure complete coverage of the weld area, providing a comprehensive view of the weld quality.
5. Analysis and Interpretation
After the scanning and data acquisition, the recorded signals undergo analysis and interpretation. Advanced algorithms and signal processing techniques are employed to detect and quantify any indications of defects, such as cracks, voids, or lack of fusion. The analysis may involve comparing the received signals with reference signals or established acceptance criteria. Trained inspectors or technicians interpret the test results, evaluating the size, location, and severity of any detected defects. They consider industry standards and specifications to determine whether the weld meets the required quality standards. The interpretation also involves assessing the significance of detected defects and making decisions regarding repair or further evaluation. This step requires expertise and experience to ensure accurate and reliable interpretation of the test results.
6. Reporting and Documentation
The final step in the process is reporting and documentation. The findings of the ultrasonic weld testing equipment are documented in a comprehensive report, including details of the test procedure, equipment used, test results, and interpretation. This documentation serves as a valuable reference for quality control, compliance audits, and future assessments. It provides a clear record of the testing process, allowing for traceability and accountability. The report may also include recommendations for corrective actions or additional testing, ensuring that any identified issues are addressed promptly.
In conclusion, the process of ultrasonic weld testing equipment involves meticulous preparation and setup, calibration and verification, coupling and transducer placement, scanning and data acquisition, analysis and interpretation, and reporting and documentation. By following this comprehensive process, industries can ensure the quality and integrity of their welded joints, promoting safety, reliability, and compliance with industry standards. Embracing the power of ultrasonic weld testing equipment enables manufacturers to achieve superior weld quality and maintain high standards of excellence in their products and processes.
See more ultrasonic welder machine


