Ultrasonic Welding: Key Design Considerations for Success
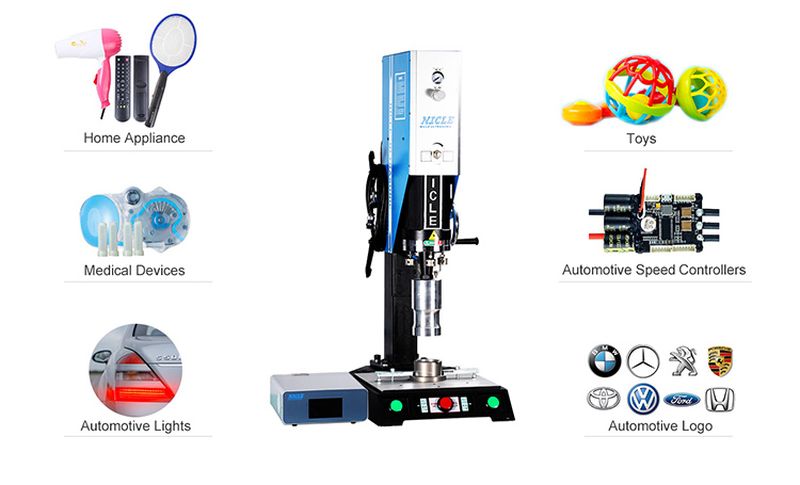
Have you ever wondered how everyday items like your car's dashboard, a medical device, or even your phone's casing stay perfectly put together? Many of them rely on a fascinating process called ultrasonic welding.
Think of it like building a puzzle—every piece has to fit perfectly, or the whole picture falls apart. In ultrasonic welding, the design of those pieces can make the difference between a strong, reliable bond and a weak one that breaks under pressure.
That's why we're excited to share the ultrasonic welding plastic design guideline with you! We'll walk you through the key ultrasonic welding design considerations that lead to successful ultrasonic welding projects.

Table of Contents
Why Design Matters in Ultrasonic Welding
Material Selection: Ultrasonic Welding Compatibility Requirements
Ultrasonic Welding Joint Design Essentials
Designing for Structural Integrity and Sealing
Sonotrode and Tooling Design
Assembly Preparation and Process Optimization
Validation and Testing Methods
FAQs
Conclusion
Why Design Matters in Ultrasonic Welding
Imagine building a puzzle where the pieces don't quite fit—frustrating, right? In ultrasonic welding, poor ultrasonic welding design can feel just like that, leading to weak joints, flash formation (that's the excess material that oozes out), or even complete part failure. But here's the good news: with the right ultrasonic welding design, you can avoid these headaches and create strong, reliable welds every time.
Ultrasonic welding uses high-frequency sound waves to melt materials at the joint, but if the joint geometry isn't spot-on, the energy doesn't focus where it should. For example, if the contact area between parts is too large, the energy spreads out, like butter over too much bread, and you end up with a weak bond.
On the flip side, a small, precise contact area—like a spike-shaped energy director—concentrates the energy, melting the material exactly where you need it. That's why ultrasonic welding joint design is so crucial.
Here's a comparison table to show how ultrasonic welding joint design choices can make or break your project:
Design Aspect |
Good Design |
Poor Design |
|---|---|---|
Joint Geometry |
Small initial contact area (e.g., energy director) |
Large contact area, leading to weak welds |
Material Compatibility |
Similar melting points (e.g., ABS to ABS) |
Dissimilar materials with different melting points |
Alignment Features |
Built-in pins or snaps for precise alignment |
No alignment, causing misalignment and uneven welds |
Material Selection: Ultrasonic Welding Compatibility Requirements
Choosing the right materials for ultrasonic welding is like picking the best teammates for a group project—if they don't work well together, the whole thing can flop.
In ultrasonic welding, high-frequency sound waves heat up and join materials, usually plastics. But not all plastics are good at this. Pick the wrong ones, and you might end up with a weak weld or even a total failure. That's why material selection is super important.
How Material Properties Affect Welding
Materials have special traits that decide how well they'll weld. Here's what to look out for:
- Melting Temperature: This is how hot a material needs to get before it melts. For a strong weld, both materials should melt at similar temperatures. If one melts way before the other, you'll get a messy or weak joint.
- Stiffness: Stiffer plastics, like ones mixed with glass fibers, don't bend easily. This can make welding harder because they don't squish together as well under pressure.
- Damping: Some materials soak up sound waves like a sponge soaks up water. If too much energy gets absorbed, there won't be enough left to heat and melt the plastic for a good weld.
Welding Dissimilar Plastics
What if you need to weld two different plastics, like attaching a polycarbonate lens to an ABS base? This is called welding dissimilar plastics, and it can be tricky.
The key is to pick materials with similar melting points and chemical makeups. For example, ABS and polycarbonate weld pretty well together because they're close enough in how they behave. But try ultrasonic welding polyethylene (like in plastic bags) to polypropylene (like in bottle caps), and it's a no-go—they're too different.
According to the ASTM D638, here's a quick table to show some matches that work and some that don't:
Compatible Materials |
Incompatible Materials |
|---|---|
ABS to ABS |
Polyethylene to Polypropylene |
Polycarbonate to Polycarbonate |
PVC to Nylon |
ABS to Polycarbonate |
Acrylic to Polyethylene |
Polystyrene to Polystyrene |
If you're not sure, test a small piece first. It's better to experiment a little than ruin a big project!
Ultrasonic Welding Joint Design Essentials
The joint is where two parts meet and melt into one. How you design it decides if the weld is strong or weak.
Shear Joint: Design and Optimization
A shear joint is like a tight hug between two parts—it's super strong! It's used when things need to handle pulling or twisting, like car parts on a bumpy ride. Here are the design tips:
- Overlap Distance: The parts should overlap by about 1.5 times the wall thickness. Too little, and it might snap.
- Wall Thickness: Keep the walls thick enough so they don't warp when they melt.
- Melt Volume: Plan how much plastic will melt. Too much makes a mess, and too little makes a weak weld.
Example: Think of a plastic gas tank in a car. A shear joint keeps it sealed tight, even on rough roads.
Staking: The Go-To for Metal and Plastic
Staking is like using a plastic pin to lock things in place. It's perfect for joining metal to plastic, like in phone cases or laptops.
Why It's Cool: It's fast, doesn't need screws, and works with different materials.
Design Tips:
- The stud needs to be tall enough to melt and form a strong head.
- The hole in the metal should fit just right—too big, and it won't hold.
Example: In a laptop, staking might connect the metal frame to the plastic shell. It stays solid without extra parts.
Energy Directors: The Secret to Focusing Heat
Energy directors tell the energy director ultrasonic welding energy where to go. They're small raised spots on the joint that melt first, helping the parts stick together neatly. There are lots of types—let's check out the main ones!
Butt Joint:
- What It Is: Two flat surfaces with a tiny triangle on one to focus the energy.
- Pros: Easy to make.
- Cons: Can leave messy edges if not done right.
- Best For: Simple parts, like toy cases.
Step Joint:
- What It Is: One part has a step that fits into the other.
- Pros: Strong and hides extra melted plastic.
- Cons: Harder to shape.
- Best For: Parts that need to look clean, like phone covers.
Tongue and Groove:
- What It Is: One part has a groove, and the other has a tongue that slides in.
- Pros: Helps line things up and makes a strong bond.
- Cons: Takes careful molding.
- Best For: Sealed items, like water bottles.
Criss-Cross:
- What It Is: Surfaces with a criss-cross pattern for extra grip.
- Pros: Spreads energy evenly.
- Cons: Can be tough to clean.
- Best For: Parts that need a tight hold, like tool handles.
Textured Surface:
- What It Is: Rough surfaces with lots of tiny contact points.
- Pros: Works well with hard-to-weld plastics.
- Cons: Might wear out the welding tool faster.
- Best For: Tricky materials that don't melt easily.
Perpendicular:
- What It Is: Energy directors at right angles to the weld line.
- Pros: Great for thick parts.
- Cons: Can melt unevenly if not lined up.
- Best For: Big pieces, like car bumpers.
Interrupted:
- What It Is: Energy directors with gaps, like a dotted line.
- Pros: Keeps things neat by controlling the melt.
- Cons: Not as strong as solid lines.
- Best For: Delicate parts, like eyeglass frames.
Chisel:
- What It Is: A sharp edge that focuses energy precisely.
- Pros: Perfect for small welds.
- Cons: Can break during molding.
- Best For: Tiny items, like hearing aids.
Core Principles of Joint Design
Whether we're working with a shear joint, a butt joint, or any other type, some universal principles apply across the board. These universal ultrasonic welding joint design requirements ensure our welds are strong, reliable, and consistent every time we fire up the welder.
Uniform Contact Area: The Key to Even Heating
A uniform contact area means the two parts we're welding touch each other evenly across the whole joint. It's all about making sure the energy from those high-frequency vibrations spreads out just right.
Why does this matter? Ultrasonic welding uses vibrations to create friction and heat where the parts meet.
If the contact isn't uniform, some spots might overheat and melt too much, while others stay too cool and don't bond properly. The result? A weak weld that could fail when we least expect it.
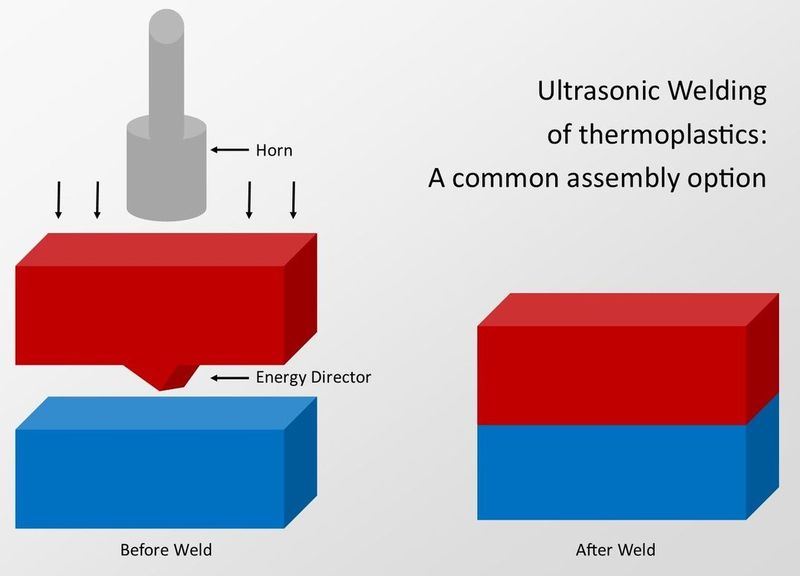
Small Initial Contact Area: Focusing the Energy
Next up is the small initial contact area, and don't worry—it's simpler than it sounds. When we start welding, we want the melting to kick off at specific points and then spread out smoothly.
We can shape them in all sorts of ways—triangular, conical, or even spike-shaped—depending on what works best for the job. For example, spike-shaped energy directors are great for pinpoint precision, making sure we maximize energy density right where we need it.
Alignment Mechanisms: Getting Everything in Place
Finally, let's chat about alignment mechanisms. Precision is everything in ultrasonic welding—if our parts are even slightly off when we start, the weld could be weak or fail. That's why we build in features to make sure everything lines up perfectly before the vibrations begin.
These alignment tricks can be as simple as molded pins on one part that slide into holes on the other, or snaps that click everything into place. Sometimes, we use self-locating designs where the parts' shapes naturally guide them together—like puzzle pieces fitting snugly.
Designing for Structural Integrity and Sealing
When we design for ultrasonic welding, two big goals stand out: making sure the parts are strong enough to do their job and sealing them tightly when needed. Think of it like building a sturdy, leak-proof container—you want it to hold up under pressure and keep everything inside safe. <Learn plasic welding tips>
Mechanical Performance: Strength Where It Counts
First, let's talk about mechanical performance. Our welded parts need to handle real-world forces—like pulling, twisting, or heavy loads—without breaking. Whether it's a car part bouncing down the road or a medical tool under stress, the weld has to be tough.
- Tensile Strength and Shear Resistance: These are fancy terms for how much pulling or sliding force the weld can take. To get this right, we chooseultrasonic welding joint designs like shear joints (covered in Section 4), which overlap the parts for extra strength. For example, in automotive parts like dashboard pieces, shear joints keep everything solid despite vibrations or bumps.
- Design Tips: We make sure the weld area spreads out the stress evenly. A tiny weld might crack under pressure, so bigger is often better here.
Hermetic Seals: Locking Out Leaks
Now, let's switch gears to hermetic seals—welds that don't let air, water, or anything else sneak through. This is super important for things like medical devices or packaging, where leaks could mean contamination or failure.
- Double Energy Director Designs: Here's a cool trick we use: double energy directors. With two of them, the first melts to start the bond, and the second melts to seal it tight. It's like double-locking a door—extra security for critical jobs.
- Keeping It Clean: For a seal to work, the parts have to be spotless. Dust, oil, or leftover mold release can mess up the weld, leaving gaps. We always clean everything thoroughly before starting.
Sonotrode and Tooling Design
In ultrasonic welding, the tools we use are the unsung heroes that make everything work. For us, those tools are the sonotrode (the welding tip that delivers the ultrasonic energy) and the tooling (the fixtures that keep parts in place). These components ensure the energy hits the right spot for a solid weld.
Key Sonotrode Parameters: Material and Geometry
The sonotrode is the heart of the operation—it channels ultrasonic vibrations to the weld area. Getting it right means picking the best material and shape for the task.
- Material Selection: Sonotrodes are typically made from titanium or aluminum. Titanium is tough and long-lasting, ideal for heavy-duty jobs like welding car parts, but it comes with a higher price tag. Aluminum is more budget-friendly and works fine for lighter projects, though it wears out quicker. For high-strength welds, titanium's your go-to; for cost-saving needs, aluminum steps up.
- Geometry and Amplitude: The sonotrode's shape controls how energy spreads. A contoured tipcan match a part's curves, delivering even energy across the weld. Then there's the amplitude gain ratio(Gain Ratio=Output Amplitude÷Input Amplitude), which boosts the vibrations. Plastics often need a ratio of 1.5 to 2.5, while metals might demand more.

Tooling for Complex Geometries: Custom Sonotrode Design
Not all parts are simple flat pieces—some have curves or odd shapes that complicate welding. It's like trying to paint a tiny detail with a giant brush. That's where custom sonotrodes shine.
- Why It's Key: For parts like an automotive dashboard with multiple contours, a standard sonotrode might skip spots or overdo others. A custom sonotrode, designed to fit the part's shape, ensures every inch gets the right energy for a strong weld.
- How It Works: We start by studying the part, then use 3D modelingto craft a sonotrode that follows its lines. This tailored fit guarantees consistent energy delivery, making welds reliable even on tricky designs.
Impact of Process Parameters
The material and geometry of the welding horn (sonotrode) significantly influence amplitude and time in ultrasonic welding. Titanium sonotrodes require higher amplitude for metal welding due to their durability and stiffness, effectively transferring energy to the workpiece.
In contrast, aluminum sonotrodes, being softer, are used for lower-amplitude applications. The horn's geometry, such as stepped or exponential shapes, affects vibration transmission and energy distribution. Optimizing these parameters ensures efficient energy transfer and strong weld quality.
Assembly Preparation and Process Optimization
Imagine you're baking a cake: you need the right ingredients, a clean kitchen, and precise oven settings to get that perfect fluffy texture. In ultrasonic welding, it's much the same—preparing your parts and fine-tuning the welding settings are essential for a strong, reliable bond.
Critical Parameters: Time, Pressure, and Amplitude
In ultrasonic welding, three key settings dictate the quality of your weld: time, pressure, and amplitude.
- Time: This is how long the ultrasonic vibrations are applied to the parts. Too little time, and the bond won't form properly; too much, and you could overheat or damage the material.
- Pressure: This is the force pressing the parts together during welding. It needs to be just right—enough to ensure good contact, but not so much that it deforms the parts.
- Amplitude: This measures the strength of the vibrations. Higher amplitude speeds up melting, but it can be too aggressive for some materials.
Example: Thin-Walled Parts
For thin-walled parts—like plastic cups or medical device casings—high amplitude can spell trouble. It might cause melt-through, where the plastic overheats and forms holes or weak spots. To avoid this, lower the amplitude and tweak the time and pressure carefully.
Pre-Weld Preparation: Cleanliness and Environment
Before the welder even turns on, preparation is key. Two big factors here are keeping things clean and managing the environment.
- Cleanliness: Dirt, oil, or residue (like mold release agents from manufacturing) on the parts can sabotage the weld. It's like trying to glue two pieces of paper covered in dust—the bond just won't hold. To fix this, clean the parts with alcohol or a mild solvent to ensure a pristine surface for the ultrasonic energy to work its magic.
- Environmental Factors: Temperature and humidity can change how plastics behave. High humidity might cause parts to absorb moisture, affecting how they melt and bond. Extreme heat or cold can also alter the material's properties. Keep RH below 30% for ABS.
Temperature control can be achieved by preheating materials, optimizing welding parameters, using heat-resistant plastics, gradual cooling, and maintaining a stable environment.
Humidity control involves drying plastics, climate-controlled storage, sealed packaging, adjusting welding parameters, and regular moisture testing to prevent moisture absorption from affecting bonding quality.
Validation and Testing Methods
When it comes to ultrasonic welding, ensuring the quality and reliability of every weld is critical. Validation and testing are the steps that make sure every weld is strong, consistent, and ready for action.
Prototype Testing: Finding the Sweet Spot
Before welding hundreds of parts, we start with prototype testing—our “test batch” of welds. This is where we experiment with a few sample welds to figure out the best settings, like weld time, pressure, or amplitude, for a strong and reliable bond.
We create a handful of welds, adjusting variables like increasing the pressure or extending the weld time. Then, we test each one to see which combination delivers the strongest result. It's trial and error—finding the “just-right” recipe for that specific part.
Design Validation via FEA and Testing
Before we weld anything, we can use a tool called finite element analysis (FEA). It's like a computer game that predicts how the weld will behave under different forces—pulling, pushing, or twisting. By simulating tensile strength, shear resistance, and load distribution, we spot weak areas and tweak the design. This saves us from costly do-overs later.
Non-Destructive Evaluation: Checking Without Breaking
Once we've dialed in the settings, we need to confirm the welds are solid—without damaging the parts. That's where non-destructive evaluation comes in.
- Pull Tests: We gently tug on the welded parts to see if they hold together. If they resist the pull, we know the bond is strong. If they separate, it's back to the drawing board.
- Microscopy: Using a microscope, we zoom in on the weld line to look for tiny gaps, cracks, or weak spots. It's like inspecting a cookie's texture to ensure it's evenly baked.
Production Consistency: Keeping Every Weld Perfect
After perfecting the settings, we shift focus to production consistency—ensuring every weld matches the quality of the first.
- Statistical Process Control (SPC): We monitor the welding process in real-time, tracking metrics like weld time and energy for each part. If something drifts—like weld time creeping up—it could signal an issue, and we can fix it before quality suffers.
- Real-Time Quality Control: By keeping a close eye on the process, we catch problems early, ensuring every weld meets our standards.
- Automated Optical Inspection (AOI): Amachine-based technique that uses cameras and image processing to detect defects in manufactured products.
FAQs
Ultrasonic welding might sound complicated, but it's just a cool way to stick things together using sound waves. To help you get the hang of it, we've answered some common questions in plain language.
What is a sonotrode in ultrasonic welding?
A sonotrode is the tool that makes ultrasonic welding happen. It's the part that sends high-frequency vibrations to the materials you're joining, melting them together. Usually made from strong stuff like titanium or aluminum, it's designed to fit the specific job, ensuring a solid weld.
What is a major hazard in ultrasonic welding?
One big hazard is the high-frequency vibrations. They're loud—too loud for your ears if you're not protected. It's like being near a blaring speaker; over time, it can hurt your hearing. That's why people working with ultrasonic welders wear ear protection and stick to safety rules.
Can ultrasonic welding damage components?
Yes, it can—if you don't set it up properly. Too much energy, pressure, or time can overheat the parts, making them warp or crack. It's like burning toast: too much heat ruins it. But with the right settings and a little care, you can avoid damage and keep everything in tip-top shape.
Is ultrasonic welding cost-effective for high-volume production?
Totally! After the setup's done, ultrasonic welding is super fast and efficient, which is awesome for making lots of stuff. The single welding can be as short as 0.5 seconds. For big production runs, it's a money-saving winner.
What is the maximum thickness that can be welded in ultrasonic welding?
For plastics, you're usually looking at a max thickness of about 0.25 inches (6.35 mm). It depends on the material and the welder's power, though—thicker stuff might need extra-strong equipment or a special trick. Refer to Section 3 for compatible material pairs and thickness limits.
Conclusion
From picking the right materials and designing smart joints to tweaking those process settings and testing everything out, the plastic ultrasonic welding design guide tells you that ultrasonic welding is both an art and a science.
The big takeaway? Good ultrasonic welding joint design is the secret sauce for strong, reliable welds. On the flip side, when you nail the ultrasonic welding design, you get welds that are tough, consistent, and ready for whatever challenges come their way.
Testing is your best friend here. It's like double-checking your work before turning it in. With tools like visual checks, leak tests, and strength tests, you can catch any hiccups early and make sure your welds are top-notch.
For expert guidance, consult industry leaders like Dizo Global. With our expertise and knack for tackling tough welding challenges, we are the perfect partner to help you get it right the first time—whether it's a one-off project or a full production run.